
BSc1a (Weekly Journal):
Week One:
HTML Coding (Tuesday):
During this week, I was introduced to HTML coding as well as CSS coding. Firstly, I learnt that HTML is a declarative coding language, mainly used for structure and to create something more direct on a web page. This form of coding focusses on the desired outcome from coding. Imperative languages are more relative to the likes of Java and python coding. I learnt that HTML can be unlocked when creating in a new file in Visual studio, by creating an index.html file. On top of this, opening the page with a ! Symbol will provide the user with the structures required for HTML coding, such as the body, head and title etc. The main thing I struggled with HTML coding is understanding the parent and child theory. This being that whatever affects the parent element will also affect what’s underneath (child elements). However, I am beginning to further understand the fundamentals for HTML coding, incorporating the use of tags, id’s and classes into my work.
CSS Coding (Thursday):
Furthermore, I also explored the use of CSS coding, which is again declarative, but is freer in the way you can express and manipulate elements. For example, CSS coding can be used to move objects, give them properties as well as change colour and any other creative features. The main thign I struggled with CSS coding was identifying the different DIV,s used in a formulaic way which would allow me to provide a confident structure to my code. On the other hand, I feel confident in my ability to identify the use of classes and DIV’s, which can be used via .class and #”name of DIV”.
Week Two:
Tuesday:
For this day, I continued to further explore the use of HTML and CSS coding. For example, I explored how to use CSS within HTML which I now know can be used via a <style> tag, this can be incorporated when you want to target a whole element, such as a paragraph without needing to use DIV’s or Classes. One example of how I used this was to change the colour of a text or the font of the text. On top of this, we explored in depth CSS coding via a workshop in the afternoon by a professional who showed me (and the class) websites he helped to make, as well as discussing the more complex and wider range of uses for CSS coding. My main struggle for this day was to keep up with the speed the class has been reviewing and learning coding (this is more of a soft skill struggle); however, it left me in positions where I felt lost. To tackle this, I began doing my own coding on the side through W3 schools as well as asking AI prompts to help me understand the basic uses of CSS coding. Finally, I progressed in the creative aspect of CSS coding, appreciating its malleable and broad use.
Thursday:
During this day, I (and my class) was introduced to two main software applications. The first being Git(hub), which allows coders to edit their work by saving previous versions of a code and branching off to work on their separate code, allowing them to add it back to a new version of the code, and this attribute allows for multiple coders to work on a project at a time. Lastly, we were exposed to the world of WordPress. WordPress is a well known website software application, which can be used to edit and publish websites for free as well as other applications, such as blogs. This software is where I will be updating my personal journal to describe my journey through this course.
Week Three:
Tuesday:
On Tuesday, my class explored the elements of CSS animations. CSS animations are a crucial component in the world of web design, this is because they make a web page more interactive and user friendly as well as adding a bit of spice to a web page, making it feel more professional. An example of CSS animations within a real- world webpage would be when the user hovers on an image (mainly on e-commerce websites) and the image zooms in. This makes the connection to the page feel more direct for the user, increasing that interactivity factor.
To do add an easing animation. First, a div must be created with a tag of “disk-1” for example. Also adding description, such as, “ease-in” to describe what the animation looks like. This is don’t in the HTML. Moving onto the CSS, add a #disk1{, followed by transition: transform 2s linear;.
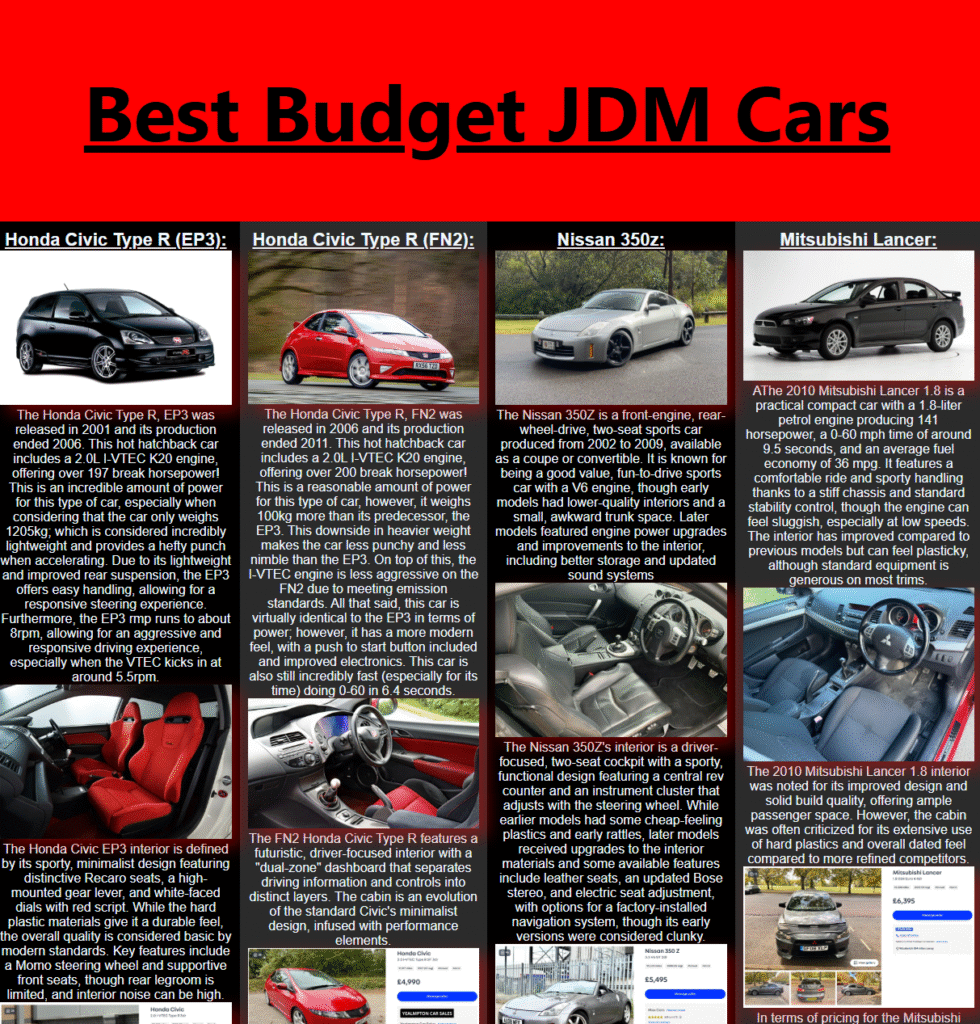
We also got assigned out first assignment project brief, being to make an image gallery using our CSS knowledge. I decided to do my image gallery on JDM cars, as I am interested in the topic. To compliment this, we also had to do a research assignment on one CSS methodology.
Thursday:
For this day, we had a lecture on the language and problem-solving aspect of coding through flow charts. This allowed us to understand the ways a computer thinks and digests information. Essentially learning that computers are basic and can only do what you provide them to do. In the afternoon, we concluded the day with self- study, allowing me to do some work on my new assignment.
Week Four:
Tuesday:
For this day, Jamie (our course lecturer was ill) so we had to watch an online video on how to make a music player via java scripts; however, I decided to take this time to continue working on my gallery assignment (1/3). At this point, I had finished all the coding for the website art gallery and proceeded to work on the necessary documents to go alongside it.
I spent about 2 hours in the morning writing up the document which describes and expresses the key factors and features I used to create my website. Looking back, I should have watched the video explaining how to implement the music player via JavaScript as I was unaware of the tight deadlines approaching for my three projects.
Thursday:
We had a presentation shown to us by someone who works in a creative computing industry, who explained how he incorporated and used AI and other computational features to produce his work. For the rest of the day, I continued working on my gallery project.
Week Five:
Tuesday:
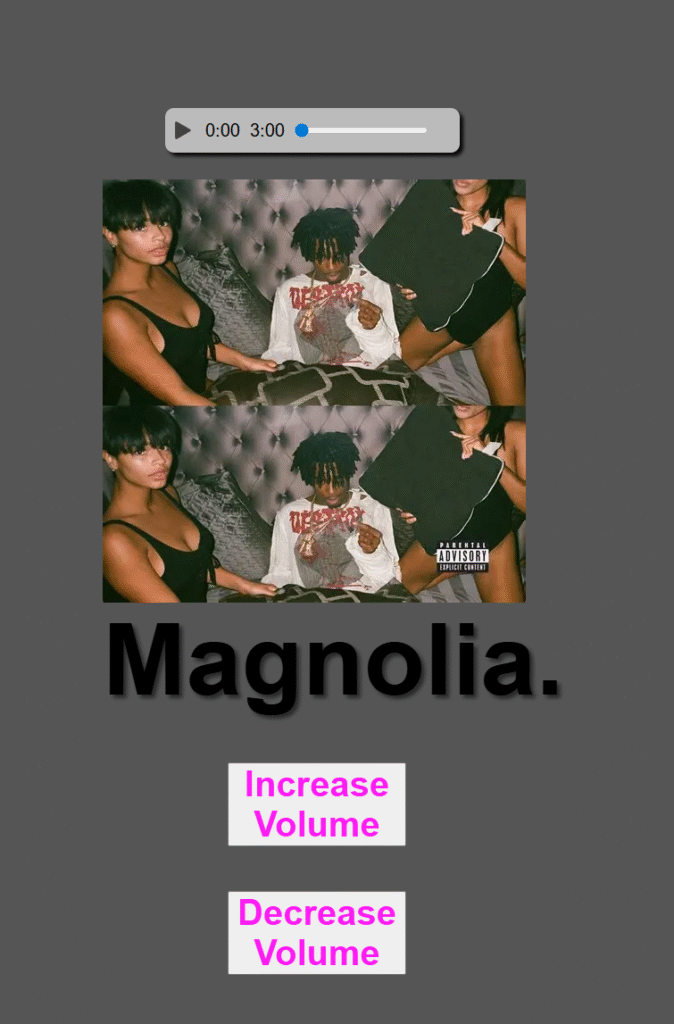
For this day, we started the morning with my tutor Jamie who showed us the process of which to create a music player. He demonstrated the different uses of Java scripts we can use to incorporate into our work. Some examples being the uses of a media player. This media player allows the user to drag the bar across several areas on the timeline. Furthermore, he also demonstrated how to implement a pause/ play button. This allows the user to stop the music and play it whenever they wish.
Thursday:
For this day, I focussed on doing the report for my media player, as well as adding onto it by adding an increase volume button. This I struggled with, as the actual functionality worked; however, I couldn’t figure out how to link it to my audio track.
Week Six:
Wednesday:
Unfortunately, for this week I was severely ill, so I was unable to attend the university lectures; however, I knew we had moved onto the third and final project, where we needed to create a data page using API’s of our choice. I began this project on Wednesday, starting and finishing my report on a chapter for a book. This was very interesting and fascinating.
In order to catch up, I would had to watch the lecture videos later on in the week.
Week Seven:
Tuesday:
For this week, I was well enough to attend my lecture. During which, my tutor aided me with implementing my volume control buttons in place for my media player. This allowed me to finish the report and the whole of the second project. So at this current time, I had completed 2/3 of the projects, as well as being done with the first half of the third project. This set me on the right track for the deadline (14th November).
Thursday:
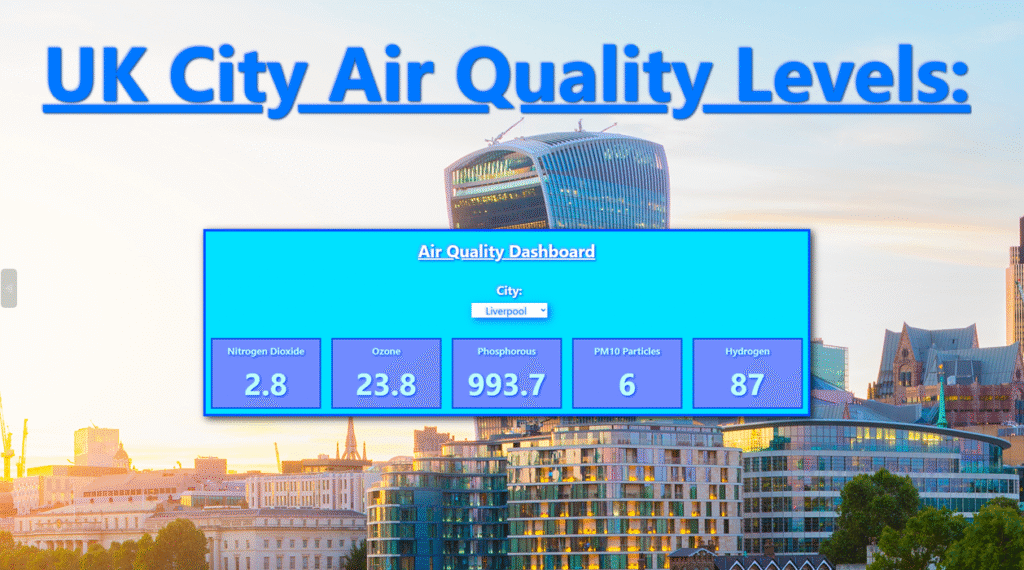
For this day, I caught up from the previous week when I was ill. During the session I was absent on, the class went through how to create an air quality API for different cities. Luckily, this session was recorded, and I was able to go back and review this and build upon it. I was now at a stage where I had started the third assignment, finishing the research report and starting the physical project.
Week Eight:
This was submission week, so I had to make sure that my third project and previous projects were in check, ready for the 14th November (Friday), deadline.
At this point, I had completed the first half of the 3rd project (completing the research report and the beginning of the physical project); so, my next steps were to continue with my physical project. From 9:30am to 12:30pm, I sharpened up my physical project, adding more chemical/ elements to be measured; as well as adding more cities. At this point, I had decided that my project would focus on UK cities air quality/ pollution levels. I also decided to go for a bluer theme which would match the weather.
During the afternoon (from 13:30pm to 16:30pm), I worked on some written work. I had now started working on my report 2 (part 2) for my third project, as well as worked on my WordPress developer journal. At this point, I was happy with how my physical project looked.
Thursday:
For this day, I prepared all the 3 projects and documentations ready to be handed in. I checked over work Finally, I put it altogether into the advised structure and zipped it and sent it, followed by completing the learning statement.
BSc1b (Monthly Journal):
Month 1(December):
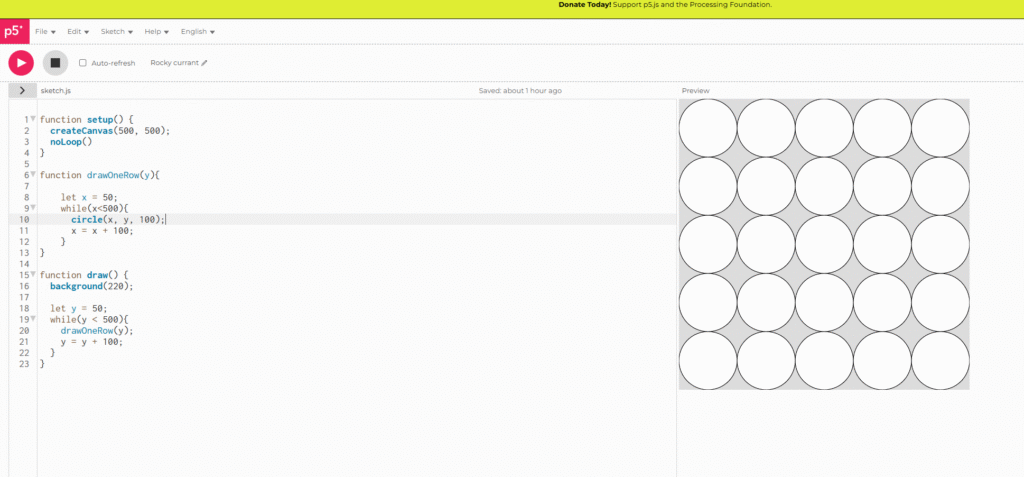
During the start of this month, I simply attended the physical workshops to get a basic understanding of my first project that would take up my attention for the month. This project being 2D algorithmic Art. This first project has been split up into 2 sections, made up of four areas. The first section being researching four unique artists who use algorithmic techniques. For example, grids etc, to create their art work. To give an of examples of the artists I chose. I picked Piet Mondrian, who is known for creating geometric art pieces of cities using oil paintings. Following this, the second part included creating 2D artwork using nested loops within P5.js.
Following this, the next section I had to complete was to use mathematical principles and implement them into a 2D art form. The first part of this section concluded of researching two distinct mathematical creative outputs. Lastly, we had to create 2D art using a mathematical formula.
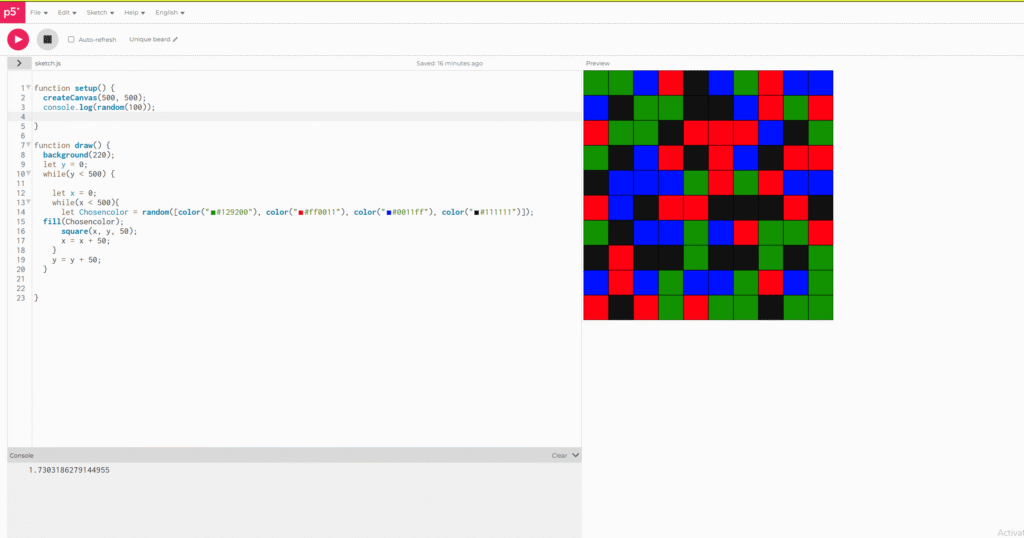
Towards the end of the month, I had developed the first part of the project, creating an art piece with shapes, which the user can auto generate themselves, using the button provided. During the development of this project, I went through many highs and lows. Attempting to incorporate more interactive elements but failed due to the code not linking to the pre- existing code I had.
Essentially my final product randomly placed shapes into areas on the canvas as well as spawning random thickness outlines.
I believe my Final product had some goof interactive elements; however, if I could go back I would have attempted to add more interactive experience, such as clicking within the shapes to create other colours etc.
Month 2 (January):
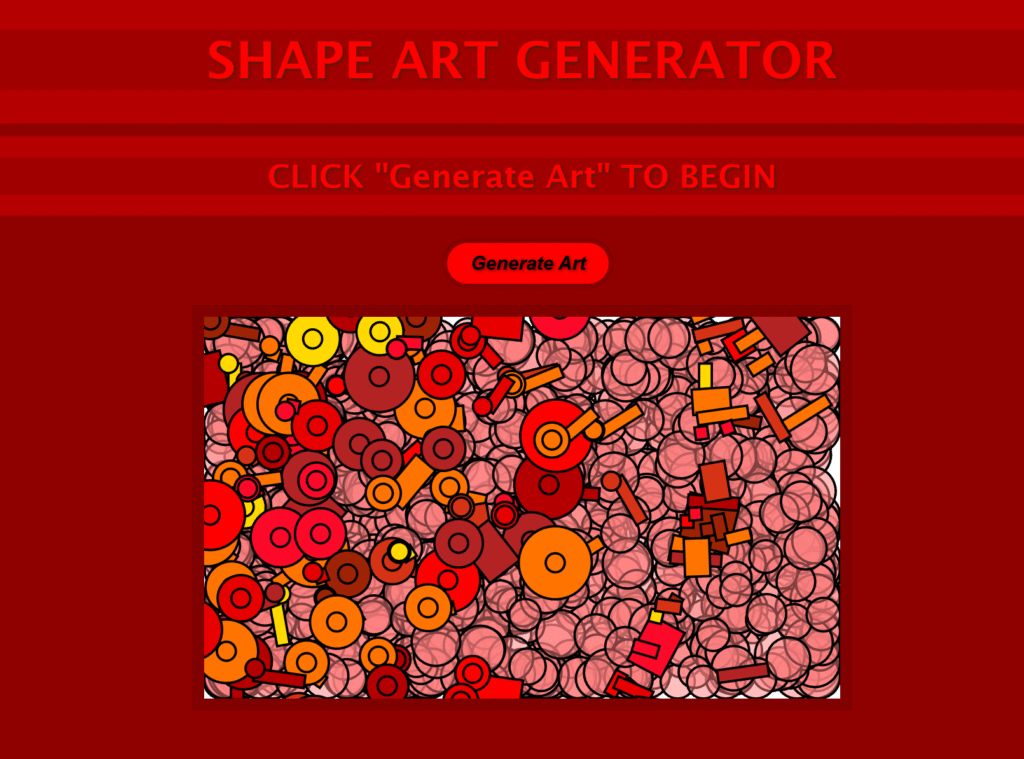
During this month, we began our part 2 of our 2D algorithmic art based project. For this part of the project, we had to create an algorithmic piece of art implementing maths. This math factor could be implemented through various ways. For example, through the use of dimensions, radius and diameter via circles as well as positioning.
For the research part of this project, I decided to use Leonardo Davinci as he implements many maths into his art work, not just through engineering like he is most famous for, but also through his art work such as the Vitruvian man. This piece incorporates circles being surrounded by a man which suggests the perfect dimensions for a man or human in general.
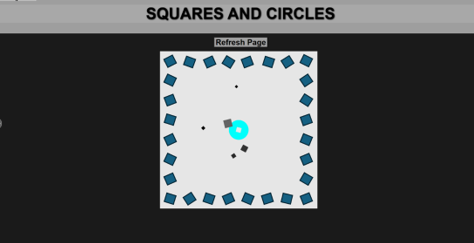
Using this inspiration, I decided to create a piece of generative art that incorporated this style. For this project, we had to use p5.js, using this tool, I first created an outline of rotating squares which follow the border of the canvas. It is important to mention that before this I had used a selection of CSS and HTML to create a simple website layout for the piece of art. Furthermore, I also (like the last project), created a refresh button where the user can reset the design. Following from the outline of the squares. I implemented a central circle which acted as the middle ground of the piece, reinforced by DaVinci’s Vitruvian man. This circle had a saturation bar which the user could drag from one side to another, changing the colour of the circle. This added more user experience and interactivity to the piece.
Problems Faced:
The main problem I faced with this art work was that I had overwritten my project with an older version, causing me to lose all my project. This annoyed me a lot as I had lost all my work and didn’t back it up. I had however taken some early screenshots of what it did look like. This meant I could prove my work, however, I did not capture the end result.
In order to tackle this issue, I will need to recreate my project during the reading week, so that I have something physical with code to submit. I have also learnt to always back up my code, even if I think I have.
Month 3 (February):
During this month, I began a new project. This being an argumentative reality project or AR. Within this project, I would have to use Unity and its built in AR applications to create this. The main project itself was separated into two main areas. The first being the research stage, and the second being the development stage, where I had to create an AR project using Unity.
For the first part of my project (research). I had to research two examples of AR that have been released into industry. For my first AR example, I used Zombies, run! , created in 2012 which is an Audio AR storytelling game with the goal of promoting exercise to users. The main premise for this audio game is that the user walks around with headphones in a city or any other location that supports this game, until they stumble upon a catalyst stating that zombies are nearby. Thus, promoting the user to run away from the “danger”. This is an exclusively audio based AR experience, given that this is an early first step into the AR industry and world as a whole.
The second AR example I researched was a game called Knightfall AR, released in 2017. This is a more advanced example of AR, including more game like mechanics and features. Within this game, there is multiple UI options as well as the ability to place a kingdom onto a surface, using scanning technology. After which the user has to defend their castle. This game struggled mainly due to the lack of creativity within game mechanics and story; however, was innovative for the time.
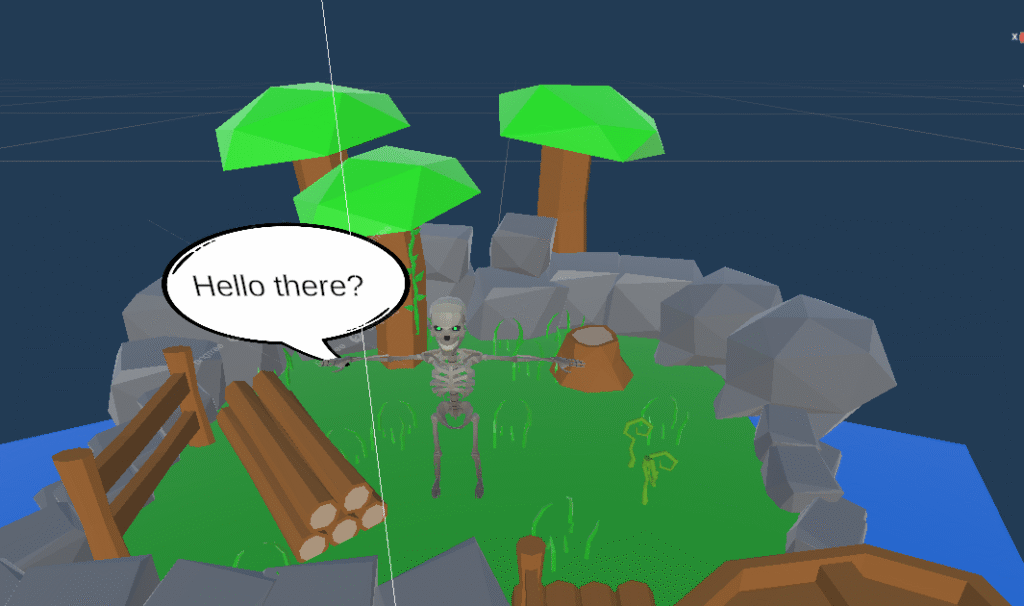
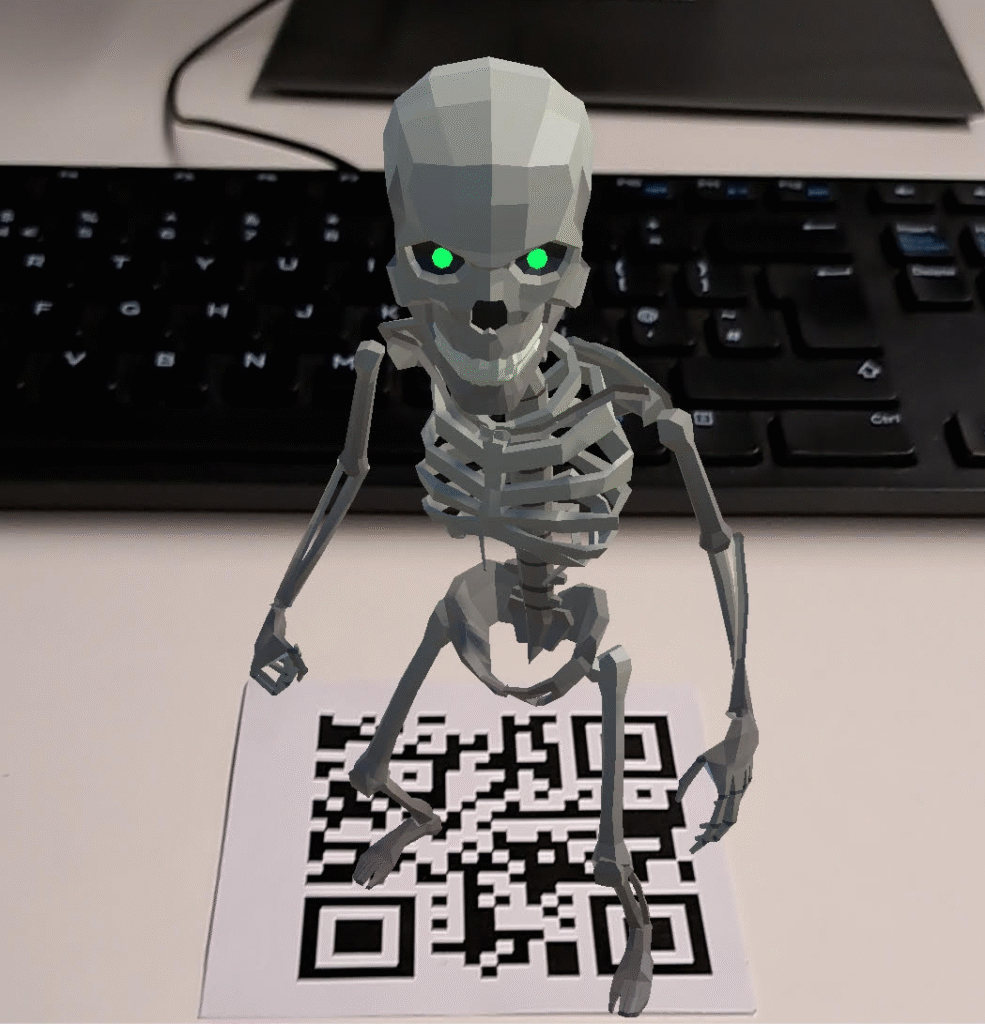
After which, I moved onto the second phase of my project which was to create an AR experience of some sort. It is important to note that this AR experience was created within Unity, and in order to connect the experience to my phone, I had to plug a USB cable from the computer into my phone via the charging cable. There are also two types of AR I could create from Unity. The first being Market AR, where an image is used to spawn an experience/ character. The second being scanning AR, where the user scans the environment to create an experience. I decided to go for a simple marker based AR experience, using QR codes.
My initial idea for this project was to create around three simple characters within low poly environments (imported from the Unity Asset Store), which each have their own QR code to be scanned, revealing a character with some simple text. However, due to time shortages, I was only able to create one character (Skeleton). For this character, I created a simple island environment, with the Skeleton character playing a simple idle animation. After a few seconds, a speech bubble spawns next to the character with some simple text. Following this, I also added music and background river noises to the scene to make the AR experience more fulfilling to the user.
Problems Faced:
The main problem I faced during this project was probably the creation of the speech bubble/ text working with a timer. My initial approach to this was treating the speech like an object, instantiating and destroying it to make it appear/ disappear; however, this was the wrong approach, and after some guidance, I discovered that all I had to do was create a canvas with some text attached. For the code, I had to make it so that the object (canvas) initially starts within the AR scene unchecked and then appears over a certain amount of time. Lastly, trying to navigate Unity was a bit of a struggle as I had not use it before and was only familiar with Unreal.
Month 4 (March):
During this month we wrapped up the progression with the AR projects which I can confidently say I am satisfied with overall outcome of the project. For the next project, we moved onto machine learning, which is when an AI is trained to determine certain outcomes through training and testing.
There are two main types of machine learning. Classification and regression. Regression predicts continuous numerical values. It models the relationship between input features and a numeric target, aiming to find a best-fit line or curve. Examples include predicting house prices, stock values, or temperature.Classification predicts discrete categories. It learns decision boundaries that separate classes in the feature space. Examples include spam detection, disease diagnosis, and image recognition. Popular algorithms include Logistic Regression, Decision Trees, Random Forest.
For the project brief, we had to create an image classification model. To do this, I had to install extensions, such as, torch etc. This was then coded into jupyter, but for me had to be coded inside of google colab due to the jupyter application not working. This led to some issues as I could not save the images within my project, thus, I had to save them onto my google drive and add an additional line of code that allowed the model to access my google drive for images.
The steps for creating this image classification model was to essentially train and then test the model via data (images). Training the model consisted of grouping and labelling the images into numbers through an algorithmic system. Next, these images would have to be batched to make them easier for the model to digest. Testing the data acted as a quick prototype test that allowed the model to be more precise with its prediction about what the image was.
Overall, I struggled with this project a lot more than previous projects, mainly due to the fact that we had to learn python (a new language) whilst also trying to implement it into a learning machine. If I was to go back, I would have tried to fix Jupyter to allow an easier platform to code on. Negatives aside, I will say that python was easier for me to learn than JS.
Month 5 (April):
During this month, we moved onto another unit project- the Creative Tech project. This marks the last unit for my first year doing my Creative Computing course. This unit has been split into two projects. The first project being an independent task, in which we had to research and produce a physical example of creative tech. For the first part (research), we had to find an inanimate object that you feel connected to and explain how it works and how it is attached to myself. For this part, I chose my phone as it is the most used intimate object that I own, I rely on it for so much, such as social networks, banking etc. It is an object you have to live with in the modern world. Following from this, we had to find one artistic project with creative tech used within its core, and then explain its functionality and purpose. For this, I chose the “Can’t help myself” Robot, which is a robot arm designed to constantly sweep or clean the floor of its exhibition room. The substance it is designed to clean is a red, viscous substance (possibly a representation of blood). The whole point of this robot piece is that no matter how hard the robot tries, it can never fully clean the substance. It is a representation of capitalist life, giving your time and life away to meaningless corporations just to reach no end, and the surge for more capitalism continues.
For the first physical project (part 2), we had to create an artistic electronic piece using an Arduino and the software. For this project, we were required to use one Piezo Buzzer, one LED and one LCD screen. For this project, I simply made an Arduino with all these components; however, I decided to use two red LED’s which flicker one after another, in an almost sync like pattern. Following from this, the buzzer played a song through multiple notes. This was a more physical project, and I enjoyed putting wires together, as well as building and connecting the components; however, the Arduino software required us to code in C++. At this point, coding is still a large weak point of mine, and I struggled to code it; however, with some assistance was able to make a fully operational device. The LCD screen simply presented “Hello Joel”.
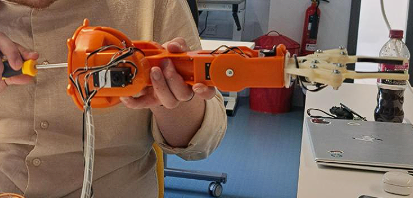
For the second part of this unit, we had to work as a group to produce a prototype for a proposed product, and then present it. For the first part of this project, we had to research the problem the prototype was going to solve. In our case this would be a replacement for holders and clamps for soldiering etc. This idea was universal for all items (within limits).Lastly, we had to come up with a diagram of the circuits to explain and present what we made, for this, we used Tinkercad.
We decided to use the BRACCIO arm which could be remotely operated and used to hold anything or do whatever the user could think of. We programmed the BRACCIO arm through he Arduino software and got to a point where the arm was connected.
Month 6 (May):
During this month, we were still working on the group project. Furthermore, it was also coming to the last few weeks of the first year for my course. During this month, I switched from Creative Computing to Creative Tech and Robotics, mainly because I found the physical aspect more intriguing compared to the coding side.
Continuing onto the group projects, we had finished the presentation. For the presentation, I would discuss about the research and components used. For the coding and in depth explanations of components, Jacob and Lennon (team members) would explain them during the presentation.
We now had a fully finished prototype, with two joysticks attached to the Arduino board as well as a HAT board. The BRACCIO robot is controlled by the X, Y and Z axis. The prototype moved properly; however, we noticed the bottom kept on slipping due to screws being too tight. To tackle this, we loosened them into new holes to make the prototype stronger.
On Tuesday the 12th, we presented our PowerPoint. I believe it went well, with some solid feedback from our peers. I was nervous but felt like I articulated myself well. On the following Friday, I handed in all my work, and was done for the academic year.